This guide uses Samsung Galaxy F23 5G as the target phone. Let’s name our kernel KoolKernel. Here’s a quick rundown of what we are going to cover:-
- Getting the kernel source code
- Setting up the toolchain
- Compiling the source
- Packaging the kernel
- Flashing it onto the phone
- Test driving the kernel
For inspiration, this is how I set up the environment on my system.
~/samsung
    ├── build       # build stuff
    ├── kernel      # kernel source
    ├── package     # packaging area
    └── toolchain   # toolchain
Getting the kernel source code
- Get the source from Samsung OpenSource.
- I did some changes and re-uploaded the source to GitHub here. Feel free to use the changes as inspiration for your kernel!
Setting up the Toolchain
The two components needed for the toolchain are :-
When you are done downloading the toolchain, the toolchain directory should look like this:-
linux: clang for ARM
cross: cross-compiler toolchain
toolchain
    ├── cross
    │   ├── aarch64-linux-android
    │   ├── bin
    │   ├── COPYING
    │   ├── COPYING3
    │   ├── COPYING3.LIB
    │   ├── COPYING.LIB
    │   ├── COPYING.RUNTIME
    │   ├── lib
    │   ├── libexec
    │   ├── MODULE_LICENSE_GPL
    │   ├── NOTICE
    │   └── repo.prop
    └── linux
        ├── bin
        ├── include
        ├── lib
        ├── libexec
        └── share
Compiling the source
For this kernel, the best compilation environment is set up using Ubuntu 18.04, but we are not savages, so we won’t set up a new Linux installation with that ancient thing just for a toolchain. Instead, we will use Docker to create a Ubuntu 18.04 container with the necessary dependencies installed within the image.
Here is the Dockerfile and here is the docker-compose.yml for easy deployment of the containerized build environment with the necessary mounts. Make sure you read the yml file and modify the mounts for your scenario.
Once you have a working kontainer, here is the script that sets up the variables needed and does the actual configuring and compiling. I use this command to trigger the build. build_mykernel refers to the script itself, so replace it with build_kernel.sh for your use.
If all goes well, your kernel will be compiled and available at ~/samsung/build/arch/arm64/boot/ as a binary Image file with no extensions. Now let’s move on to packaging the kernel in a flashable zip so we can install it into the phone.
Packaging the kernel
- Clone this repository.
cdinto the local copy of the repo and take a look atzip_up_kernel.sh.- You might want to edit lines 4 and 5 according to your build environment.
- Execute the script. It will fetch the kernel image and dtbo for driver tree overlay stuff.
- Once done, you will have a file titled
kernel.zipthat you can flash using your favourite aftermarket recovery. I recommend TWRP.
Flashing the kernel
- Just flash the zip as usual. You can transfer the zip to your phone using a memory card, or plain old
adb sideloadthe file. - You don’t need to clear any caches. Your phone will just boot up if the kernel was built successfully.
Testing the kernel
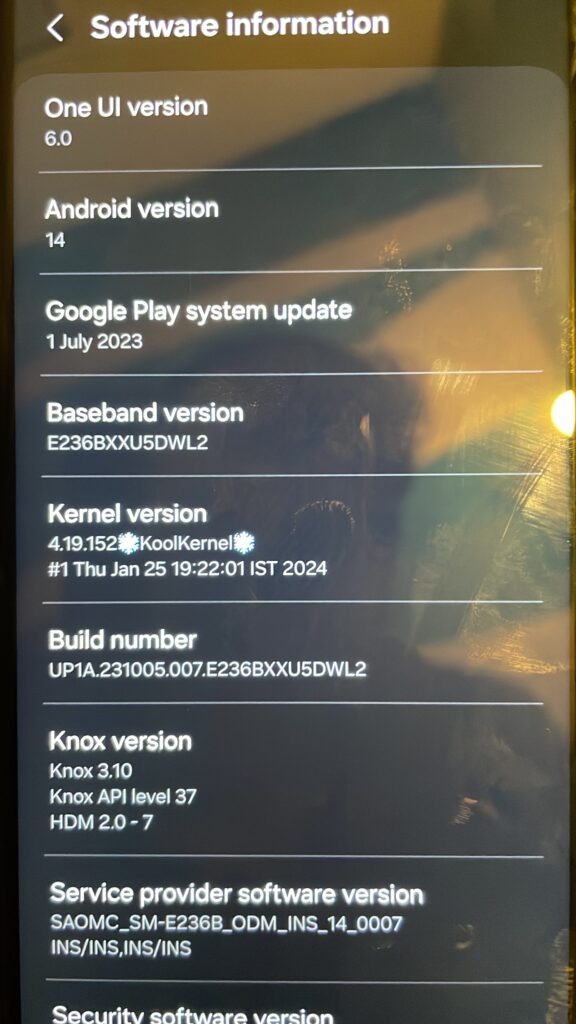
If all goes well, you can check the name of the new kernel in the System Settings like this image:-
This post would be incomplete without my special thanks to MrSiri for helping me with tons of suggestions and guidance during the toolchain setup process – setting up the toolchain was the hardest part! He actively develops and maintains BoostKernel for F23/M23 and contributes a lot to the hacker community!
That’s all, folks. With this devflow, I gift you your new hobby – Android Kernel development!
Have fun!